
 springmvc helloworld
原文链接:https://blog.csdn.net/qq_39355828/article/details/119719062 (opens new window)
# springmvc :helloworld
# 1.项目结构
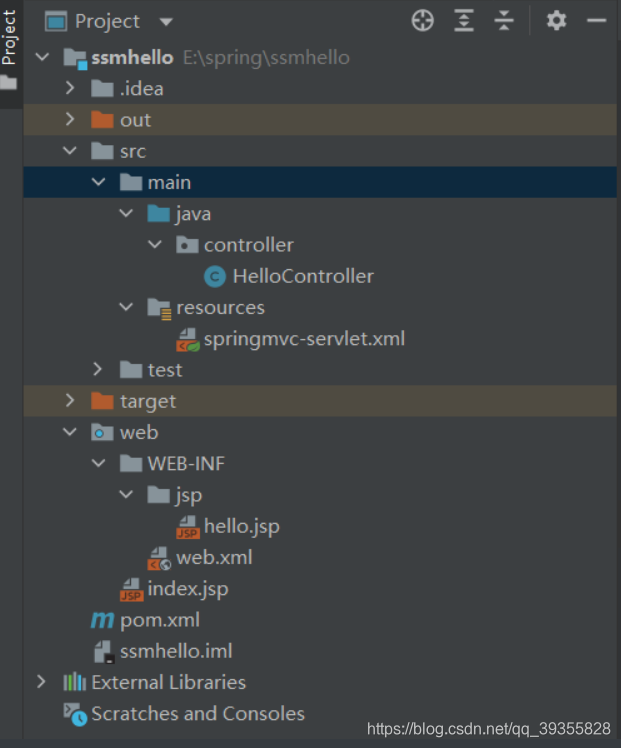
# 2.hello world过程
1.新建meaven项目,导入依赖,主要导入spring-webmvc依赖
<?xml version="1.0" encoding="UTF-8"?>
<project xmlns="http://maven.apache.org/POM/4.0.0"
         xmlns:xsi="http://www.w3.org/2001/XMLSchema-instance"
         xsi:schemaLocation="http://maven.apache.org/POM/4.0.0 http://maven.apache.org/xsd/maven-4.0.0.xsd">
    <modelVersion>4.0.0</modelVersion>

    <groupId>org.example</groupId>
    <artifactId>ssmhello</artifactId>
    <version>1.0-SNAPSHOT</version>

    <properties>
        <maven.compiler.source>8</maven.compiler.source>
        <maven.compiler.target>8</maven.compiler.target>
    </properties>
    <dependencies>
        <dependency>
            <groupId>junit</groupId>
            <artifactId>junit</artifactId>
            <version>4.12</version>
        </dependency>
        <dependency>
            <groupId>org.springframework</groupId>
            <artifactId>spring-webmvc</artifactId>
            <version>5.1.9.RELEASE</version>
        </dependency>
        <dependency>
            <groupId>javax.servlet</groupId>
            <artifactId>servlet-api</artifactId>
            <version>2.5</version>
        </dependency>
        <dependency>
            <groupId>javax.servlet.jsp</groupId>
            <artifactId>jsp-api</artifactId>
            <version>2.2</version>
        </dependency>
        <dependency>
            <groupId>javax.servlet</groupId>
            <artifactId>jstl</artifactId>
            <version>1.2</version>
        </dependency>
    </dependencies>

</project>
1
2
3
4
5
6
7
8
9
10
11
12
13
14
15
16
17
18
19
20
21
22
23
24
25
26
27
28
29
30
31
32
33
34
35
36
37
38
39
40
41
42
43
2
3
4
5
6
7
8
9
10
11
12
13
14
15
16
17
18
19
20
21
22
23
24
25
26
27
28
29
30
31
32
33
34
35
36
37
38
39
40
41
42
43
2.配置web.xml , 注册DispatcherServlet
<?xml version="1.0" encoding="UTF-8"?>
<web-app xmlns="http://xmlns.jcp.org/xml/ns/javaee"
         xmlns:xsi="http://www.w3.org/2001/XMLSchema-instance"
         xsi:schemaLocation="http://xmlns.jcp.org/xml/ns/javaee http://xmlns.jcp.org/xml/ns/javaee/web-app_4_0.xsd"
         version="4.0">
    <servlet>
        <servlet-name>springmvc</servlet-name>
        <servlet-class>org.springframework.web.servlet.DispatcherServlet</servlet-class>
        <!--关联一个springmvc的配置文件:【servlet-name】-servlet.xml-->
        <init-param>
            <param-name>contextConfigLocation</param-name>
            <param-value>classpath:springmvc-servlet.xml</param-value>
        </init-param>
        <!--启动级别-1-->
        <load-on-startup>1</load-on-startup>
    </servlet>

    <!--/ 匹配所有的请求;(不包括.jsp)-->
    <!--/* 匹配所有的请求;(包括.jsp)-->
    <servlet-mapping>
        <servlet-name>springmvc</servlet-name>
        <url-pattern>/</url-pattern>
    </servlet-mapping>

</web-app>
1
2
3
4
5
6
7
8
9
10
11
12
13
14
15
16
17
18
19
20
21
22
23
24
25
2
3
4
5
6
7
8
9
10
11
12
13
14
15
16
17
18
19
20
21
22
23
24
25
3.编写SpringMVC 的 配置文件!名称:springmvc-servlet.xml
<?xml version="1.0" encoding="UTF-8"?>
<beans xmlns="http://www.springframework.org/schema/beans"
      xmlns:xsi="http://www.w3.org/2001/XMLSchema-instance"
      xsi:schemaLocation="http://www.springframework.org/schema/beans
       http://www.springframework.org/schema/beans/spring-beans.xsd">

</beans>
<bean class="org.springframework.web.servlet.handler.BeanNameUrlHandlerMapping"/>
    <bean class="org.springframework.web.servlet.mvc.SimpleControllerHandlerAdapter"/>
    <!--视图解析器:DispatcherServlet给他的ModelAndView-->
    <bean class="org.springframework.web.servlet.view.InternalResourceViewResolver" id="InternalResourceViewResolver">
        <!--前缀-->
        <property name="prefix" value="/WEB-INF/jsp/"/>
        <!--后缀-->
        <property name="suffix" value=".jsp"/>
    </bean>
1
2
3
4
5
6
7
8
9
10
11
12
13
14
15
16
2
3
4
5
6
7
8
9
10
11
12
13
14
15
16
4.编写Controller ,要么实现Controller接口,需要返回一个ModelAndView,装数据,封视图
package controller;

import org.springframework.web.servlet.ModelAndView;
import org.springframework.web.servlet.mvc.Controller;

import javax.servlet.http.HttpServletRequest;
import javax.servlet.http.HttpServletResponse;

public class HelloController implements Controller
{

    @Override
    public ModelAndView handleRequest(HttpServletRequest request, HttpServletResponse response) throws Exception {
        //ModelAndView 模型和视图
        ModelAndView mv = new ModelAndView();

        //封装对象,放在ModelAndView中。Model
        mv.addObject("msg","HelloSpringMVC!");
        //封装要跳转的视图,放在ModelAndView中
        mv.setViewName("hello"); //: /WEB-INF/jsp/hello.jsp
        return mv;
    }

}
1
2
3
4
5
6
7
8
9
10
11
12
13
14
15
16
17
18
19
20
21
22
23
24
2
3
4
5
6
7
8
9
10
11
12
13
14
15
16
17
18
19
20
21
22
23
24
5.注册bean ,将自己的类交给SpringIOC容器,
<!--Handler-->
<bean id="/hello" class="nuc.ss.controller.HelloController"/>
1
2
2
- 写要跳转的jsp页面,显示ModelandView存放的数据,以及我们的正常页面;
<%@ page contentType="text/html;charset=UTF-8" language="java" %> <html> <head> <title>Kuangshen</title> </head> <body> ${msg} </body> </html>
7.Tomact配置
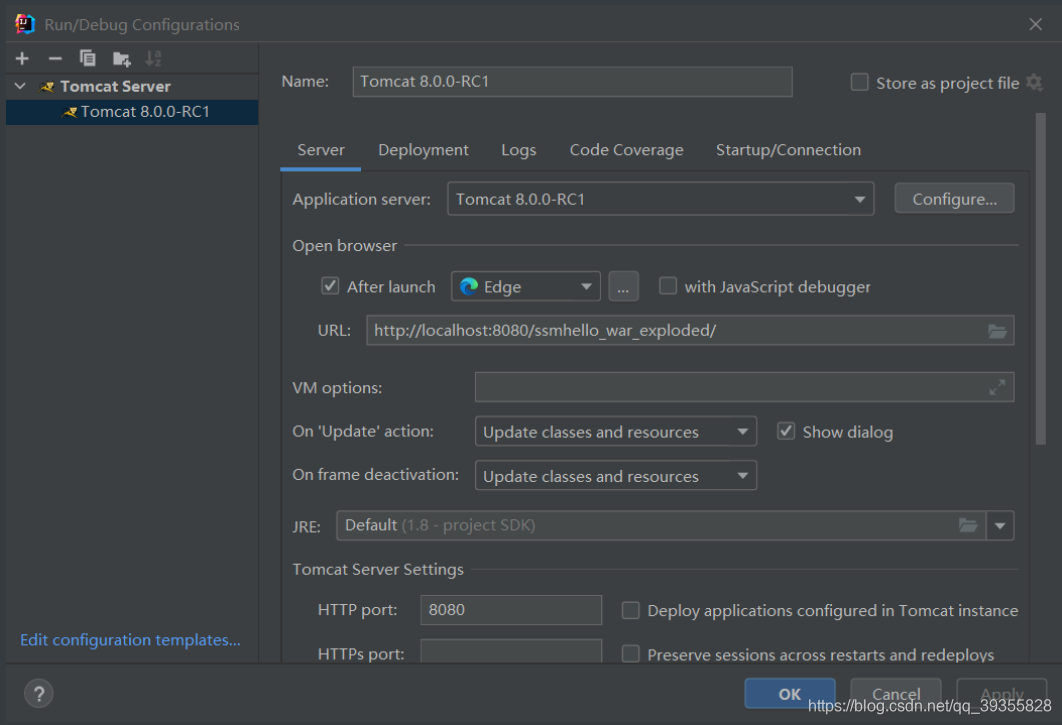
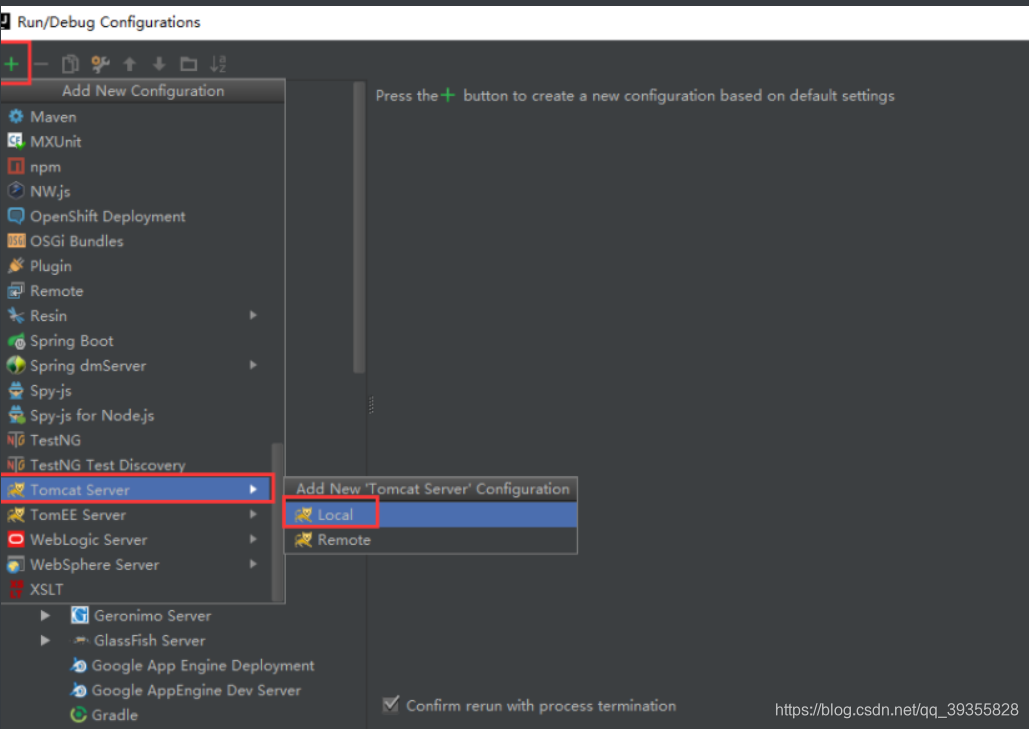
7.1、点击Run-Edit Configurations…
7.2 、点击左侧“+”,选择Tomcat Server–Local
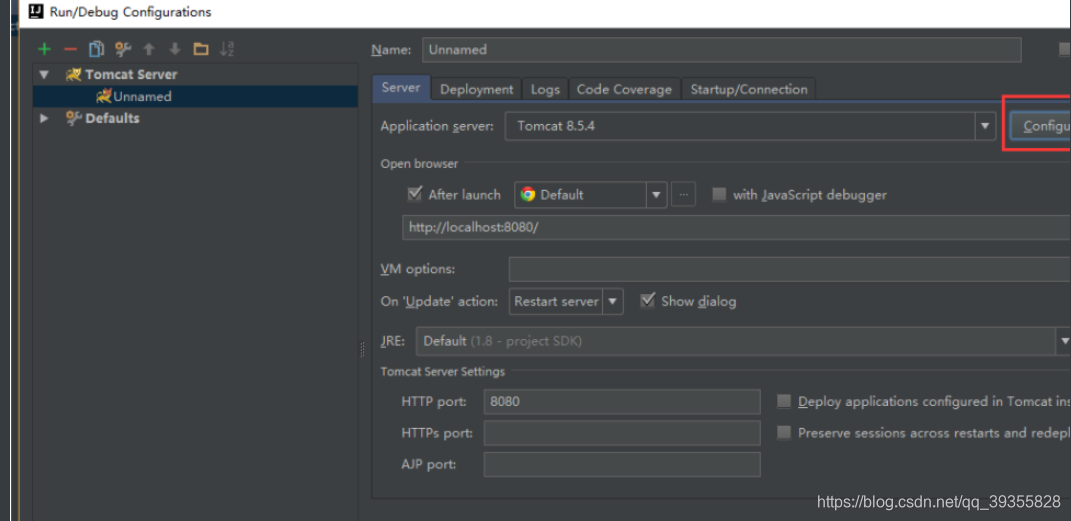
7.3、在Tomcat Server -> Unnamed -> Server -> Application server项目下,点击 Configuration ,找到本地 Tomcat 服务器,再点击 OK按钮。
编辑 (opens new window)
上次更新: 2026/08/11, 13:36:18